Ship Orders
The Sales - Ship pre-filter is used for three things:
- Displaying all Sales Orders (for the purpose of finding a Sales Order to ship or un-ship).
- Shipping one or more Sales Orders based on certain pre-determined selection criteria.
- Un-shipping Sales Orders based on certain pre-determined selection criteria.
FedEx and Sales Processing in Deacom
Deacom offers companies the option to integrate with FedEx for the purpose of shipping Sales Orders with FedEx and printing FedEx-approved shipping labels containing the appropriate information. Two flow charts, on the Shipping with FedEx and UPS page, provide a road map for how Deacom integrates with FedEx. The sections below the charts provide the supporting details for the steps/flows in the charts, including setup and processing shipments in Deacom with FedEx integration. Deacom uses an API to integrate with FedEx.
System Navigation
- Sales > Ship
Sales - Ship pre-filter
|
Field/Flag |
Description |
|---|---|
|
Continue |
Opens the Sales - Ship form for the selected order, which is used to perform multiple functions including ship orders, add freight, specify catch weights, create packages, etc. |
|
Un-Ship |
Un-ships the selected Sales Order using the original ship date of the Sales Order (opposed to the date in the "Transaction Date" field). |
|
Un-Invoice/Un-Ship |
Allows for the order to be un-invoiced/un-ship in one step.
|
|
Show Orders |
Opens the Orders to Ship form, which displays a list of orders based on the filters used on the Sales - Ship pre-filter.
|
|
Sales Order |
Search field used to select a specific order to ship or un-ship. |
|
Bill-to Company |
Filters the list of orders to ship based on the Bill-to Company specified on the Sales Order General tab. |
|
Ship-to Company |
Filters the list of orders to ship based on the Ship-to Company specified on the Sales Order General tab. |
|
Ship Via |
Filters the list of orders to ship based on the Ship Via specified on the Sales Order Mic 1 tab. |
|
Facility |
Filters the list of orders to ship based on the Facility specified on the Sales Order General tab. |
|
Facility Group |
Filters the list of orders to ship based on the Facilities that belong to the Facility Group selected. |
|
Date Based On |
Pick list used in conjunction with the start and end dates to determine which date, as specified on the Sales Order Dates tab, should be used to filter the list of orders. Options are:
|
|
Start/End Date |
Used in conjunction with "Date Based On" selection to specify the dates used to filter for orders. |
|
Transaction Date |
Used to set the date shipped for the selected order, which defaults to the current date. |
|
Order Type |
Pick list used to filter the list of orders by "Order Type" as indicated on the Sales Order General tab. Options are:
|
Orders to Ship form
Opened via the "Show Orders" button on the Sales - Ship pre-filter, the Orders to Ship form is used to drill into order details, reserve and un-reserve inventory, and ship orders.
|
Fields/Flag |
Description |
|---|---|
|
Continue/Un-ship |
Either opens the Ship Sales Orders form or un-ships the selected order based on the caption of the button.
|
|
View Detail |
Opens the selected order in view mode. |
|
Show Orders |
Allows the user to toggle the orders listed between shipped and not shipped. |
|
Reserve |
Opens the Issue/Reserve Inventory form for the selected order, which is used to reserve inventory to the selected order. |
|
Un-reserve |
Opens the De-issue/Un-reserve form for the selected order, which is used to un-reserve inventory from the selected order. |
|
Combine Orders |
Opens the Combine Orders form, which is used to combine the lines of Sales Orders with the same header information and generate a new Sales Order to be reserved, shipped, invoiced, etc. |
|
Ship All/Un-ship All |
Displays as the Ship All button when the "Show Orders" field on the form is set to "Not Shipped," or the Un-Ship All button, when the "Show Orders" field is set to "Shipped."
|
Ship Sales Orders form
Opened via the "Continue" button on the Sales - Ship pre-filter and on the Orders to Ship form, the Ship Sales Orders form is used to perform multiple functions including ship orders, add freight, specify catch weights, create packages, etc.
|
Field/Flag |
Description |
|---|---|
|
Ship Order |
Ships the quantities listed in the "Ship" column and creates a backorder for the quantities listed in the "Backorder" column. |
|
Modify |
Opens the Edit Quantity form which allows the user to substitute a Part and modify the ship and backorder quantities. |
|
Mass Backorder |
Allows the user to select which lines to backorder. For the lines selected, the quantity in the "Ship" column is moved to the "Backorder" column. |
|
Zero Backorder |
Sets the quantities in the "Backorder" column to zero. |
|
As Reserved |
Sets the "Ship" quantity to the quantity reserved to the Sales Order (which may be less than the quantity ordered) and backorders the remaining quantity.
|
|
Zero Shipped |
Sets the quantities in the "Ship" column to zero. |
|
Split Lot |
Not currently available to this form. |
|
Delete Lot |
Not currently available to this form. |
|
Add Freight |
Opens the Add Freight form, which allows the user to enter the actual freight cost and the amount to bill the customer.
|
|
Catch Weight |
Opens the Edit Catch Weights form and allows the user to add a catch weight for the selected line. |
|
Addresses |
Displays the Bill-to and Ship-to Company names, addresses, phone numbers, and contact names, which can be printed if desired. |
|
Manual Docs |
Opens the Copies to Print form, which allows the user to select a Sales Order Document or Document Group to print from the Report pick list. |
|
Scan Parts |
Opens the Scan Parts form, which allows the user to specify Parts and quantities to ship manually or using barcodes and a supported scanner.
|
|
Packages |
Opens the Packages form, which is used with the FedEx integration to manage the Packages that will be shipped for the materials specified and print labels.
|
|
LTL Freight Shipment |
Opens the Add Freight Shipment form, which is used to add freight shipment lines specifying freight class, number of pieces, dimensions, and a description. |
|
Signature |
Opens signature dialog with drawing canvas to capture electronic signatures. This field is not required. When saved, an image of the signature is attached to the sales order with a description of 'Signature', regardless of whether the order gets shipped.
|
|
Header UDF |
View and Modify Sales Order header user fields. When the form is saved, the User Field values will change regardless of whether the Sales Order is shipped or not. |
|
Generate Shipping Labels |
Generates FedEx or UPS shipping labels for the packages specified. |
|
Shipped Via |
Search field used to select the shipping method for the Sales Order. |
|
Shipping Accounts |
Search field used to select the Shipping Account for the selected order. This field will be filtered based on the Shipped Via selected/indicated in the field above.
|
|
Confirmation |
Memo field used to enter tracking numbers.
|
|
Date Shipped |
The date the Sales Order was shipped, which defaults to the current date. |
|
Facility |
Indicates the Facility for which the Sales Order was generated. |
|
Notes |
Memo field used to record additional details or special instructions.
|
|
In-Transit |
Memo field used to record additional in-transit details or instructions.
|
|
View |
Pick list used to determine how the Lots will be displayed. Defaults based on the "Default Shipping View" selection in Sales > Options > Shipping tab. Options are:
|
|
Bill-to/Ship-to |
Displays the Bill-to and Ship-to as indicated on the Sales Order. |
|
Order |
Displays the Sales Order number of the order being shipped. |
|
Freight |
Displays the Freight Type as specified on the Sales Order Misc 1 tab. |
|
Document Group |
Displays the Document Group specified on the Sales Order Misc 1 tab. |
|
Print Document Group After Shipment |
Option to have Document Groups, if specified on the sales order, print after shipment when clicking "Ship Order. In order to have documents in the Document Group physically print, the following two conditions must exist:
Notes:
|
|
Generate Shipping Label |
Upon clicking "Ship Order", generates FedEx or UPS shipping labels for the packages specified. |
Edit Quantity form
Opened via the "Modify" button on the Ship Sales Orders form, the Edit Quantity form is used to substitute Parts, modify ship and backorder quantities, view the Location Type and Location of inventory, and select the Lots to be shipped.
|
Field/Flag |
Description |
|---|---|
|
Select Lots |
Opens the Apply Inventory form, which allows the user to select the Lots to be shipped. When clicked, the 'Available' and 'Used' quantities on the Apply Inventory grid will be converted from the stock unit to the Unit selected on the Edit Quantity form as well as the 'To Apply', 'Applied', and 'Remaining' fields on the left side of the Apply Inventory form. |
|
Part Number |
Displays the Part Number being shipped on the order. |
|
Description |
Displays the Part Description. |
|
Substitute Part |
Allows authorized users to substitute a Part for the selected line.
|
|
Location Type |
Specifies the Location Type of the Part being allocated to the Sales Order. |
|
Location |
Specifies the Location of the Part being allocated to the Sales Order. |
|
Lot |
Specifies the User Lot of the Part being allocated to the Sales Order. |
|
Attribute 1-3 |
Only viewable when the value in the Ship field is < 0 for a return. Displays the company-defined lot descriptors, the names of which are defined via the "Attribute Name 1-3" fields in System > Maintenance > Captions. These fields will be disabled on this form, and unable to be changed. |
|
Container Number |
Specifies the Container identifier/number of the Part being allocated to the Sales Order.
|
|
Shipping Unit |
Item's stock unit of measure search box. When shipping an order, the units will convert back to the stock unit. When this field is changed, if there is a quantity in the Ship field, it will be converted from what was previously set to what is selected in Shipping Unit. This field is disabled when the part number selected is a catch weight item. |
|
Expires |
Specifies the expiration date for the selected Lot.
|
|
Ordered |
Indicates the quantity specified on the Sales Order for the selected line. |
|
Ship |
Indicates the quantity that will be shipped for the selected line, which defaults to the "Ordered" quantity but may be changed.
|
|
Backorder |
Indicates the quantity that will be added to a Backorder linked to the current Sales Order.
|
|
Packages |
Memo field that stores information regarding Packages for the selected line. |
Add Package form
Opened via the "Add" or "Modify" buttons on the Packages form, the Add Package form is used with the FedEx integration to manage the Package(s) and lines that will be shipped for the materials specified.
|
Field/Flag |
Description |
|---|---|
|
Add, Modify, Delete |
Allows the user to manage package lines for the selected order.
|
|
Generate Shipping Label |
Generates FedEx or UPS shipping labels for the packages specified. |
|
Modify Ship-to |
Opens the Ship-to Company record in modify mode. |
General tab
|
Field/Flag |
Description |
|---|---|
|
Package Name |
Upon saving, generates using the "Package Expression" defined in Sales > Options > Shipping tab. |
|
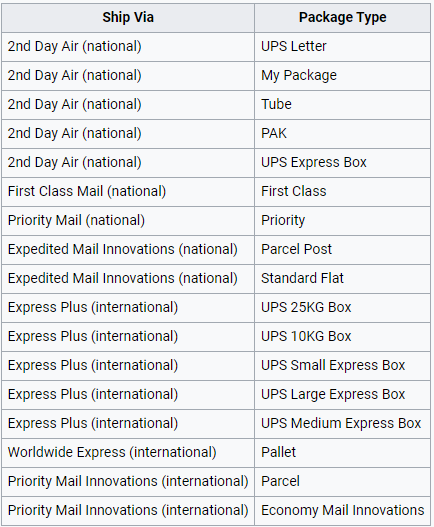
Package Type |
Defines the pre-defined packages (chart below). primarily for UPS, that will be used for the package on the sales order.
Note: For 'UPS Mail Innovation' Ship Vias, the utilized UPS Account must have Mail Innovations enabled in order for this to succeed. |
|
Weight |
Defines the weight of the package.
|
|
Unit Type |
Pick list used to define the FedEx unit used to calculate the total weight of the package, which comes from the "IATA UOM" on the Item Master Calcs tab for all Air types of transport (Overnight, Priority, etc.).
|
|
Confirmation |
Memo field used to store the FedEx-provided confirmation number.
|
|
AES Compliance |
Stores US Customs declaration information for the shipment, provided by the shipper. |
|
Height, Width, Length |
Defines the Package dimensions.
|
|
Dimension Units |
Pick list used to define the units used to measure the Package dimensions. Options are inches (IN) or centimeters (CM).
|
|
Base Charge |
Value returned by FedEx |
|
Total Charge |
Value returned by FedEx. This becomes the freight charge on the Sales Order (or a portion of the freight charge if there are multiple Packages on the Sales Order). |
|
Signatory Name, Signatory Title, Shipper Name, Offeror |
Supplied by shipper. Required if shipping a Dangerous Good. |
|
Additional Handling Instructions |
Memo field used to store additional handling instructions required to ship the package. This should not be required if the Dangerous Good and Packing Instructions are properly set up. |
|
Packaged For Cargo Air Only |
If checked, indicates to FedEx/UPS that the Package must be shipped via cargo air only.
|
|
Overpack Used |
If checked, the words "overpack used" will be printed at the end of the packing instructions on the Shipper's Declaration, or any documents where packaging instructions are used, for FedEx shipments containing Dangerous Goods.
|
|
Collect on Delivery |
If checked, indicates payment for the order is Collect and a COD return label will be generated along with the shipping label
|
User Fields tab
Deacom allows the creation of user-defined fields that, once created, are available on various master data records such as items, Vendors, and Ship-to Companies. These fields allow companies to enter and store information outside of the fields provided in the system. The user fields on the Vendor record may be used to capture information such as Number of Employees. User fields may be added via Tools > Maintenance > User Fields.
Express Freight tab
|
Field/Flag |
Description |
|---|---|
|
Booking Confirmation # |
Defines the reference number received after calling the airport and reserving space on the airplane for shipment. |
|
Load and Count |
Defines the total number of pieces per packages. |
Add Package Line form
Opened via the "Add" or "Modify" buttons on the Add Package form, the Add Package Line form is used to select a Part, enter a quantity and value, and specify Packing Instructions and Dangerous Goods.
|
Field/Flag |
Description |
|---|---|
|
Line Number |
Automatically generated by Deacom to define the package line. |
|
Part Number |
Pick list used to select the item from the selected Sales Order that will be included in this Package. Note that the "Scan Parts For Packages" field in Sales > Options > Shipping tab may be used to change this field into a text box that may be used when scanning parts. In this case, when a value is entered in (either by keyboard input or wedge scanner), the system will let the user know if the part is valid and on the order, and default the form's values as necessary. Note: Kitted parts also work within packages. The part number dropdown box shows the line number and part number separated by a colon (Example: 1:ABCDE). When the same part is on multiple lines of the sales order the part will appear in the part number field multiple times, once for each line. |
|
Quantity |
Defines the quantity of the Package being entered.
|
|
Value |
This field or the "Harmonized Code" is required for international shipments. |
|
Weight |
Defines the line weight for this package line.
|
|
Harmonized Code |
This field or the "Value" is required for international shipments.
|
|
Packing Instructions |
Search field used to select Packing Instructions for the Package being entered.
|
|
Dangerous Goods |
Search field used to select which Dangerous Good is being included in the Package.
|
|
Label Text |
Defines additional text that will be printed on the package label.
|
|
Authorization |
Only enabled when the Ship Via Method is an Air Shipment. (i.e. service type is not a ground type of shipment)
|
Add Freight Shipment form
Opened via the "LTL Freight Shipment" button on the Ship Sales Orders form, the Add Freight Shipment form is used to add freight shipment lines specifying freight class, number of pieces, dimensions, and a description.
Note: When generating LTL labels, the BOL number is the Sales Order to_billpo field and the PO number field is the Sales Order to_ordnum field.
|
Field/Flag |
Description |
|---|---|
|
Add, Modify, Delete |
Used to manage the freight shipment lines using the Add Freight Shipment Line form or deleting the selected line. |
|
Generate Labels |
Once the package is filled in and saved, this button sends the data to FedEx or UPS, who will in turn generate the shipping label, additional documentation, and confirmation number.
|
|
Role |
Pick list used to define if the company is acting as the Consignee or Shipper for this freight shipment. |
Add Freight Shipment Line form
Opened via the "Add" or "Modify" buttons on the Add Freight Shipment form.
|
Field/Flag |
Description |
|---|---|
|
Freight Class |
Pick list used to define the freight class of the shipment. |
|
Packaging Type |
Pick list used in conjunction with the "Handling Units" field to select the type of packaging used for the shipment line. |
|
Handling Units |
Used in conjunction with the "Packaging Type" to define the number of handling units.
|
|
Pieces |
Indicates the number of pieces inside the pallets. |
|
Weight |
Defines the total weight of combined line items. |
|
Height, Length, Width |
Define the dimensions of the package. |
|
Dimension Units |
Pick list used to determine if the dimensions are measured in centimeters or inches. |
|
Description |
Memo field used to store a description of the freight shipment line. |